|
Dla tego produktu nie napisano jeszcze recenzji!
 ;
...instruction is ok.
...instrukcja jest ok.
Thanks/Dzięki
;
Documentation made available quickly and It is good quality. Thanks.
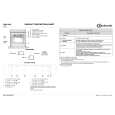
Removing the Left End Cover
Removal 1. Remove the top cover ' page 8 8.
2. Remove the Left Rollfeed Assembly ' page 8 9. 3. Release the three clips at the bottom of the end cover: first the side clip,
then the front and back clips. These may be stiff.
B
A
C
4. Pull the end cover up, and remove it from the Printer.
Reassembling: It's not easy to reinstall the end covers on the Printer. With some practice, you should learn the knack. As a guide, before you replace an end cover, take a look at the various clips on its inside, and identify where they fit on the Printer. Make sure that the primer plunger is installed properly when reinstalling the end cover.
8-10
HP DesignJet 430, 450C and 455CA Printers
Removal and Installation
|